The use of instrumented indentation in materials testing includes its widespread application in measurements of Young’s modulus and hardness on limited volumes of test material. Such situations include testing of MEMS, semiconductor parts, and protective coatings. These tests are governed by the international standard ISO 14577. Part I lays down the correct procedure and analysis of the data obtained, relying mainly on the influential paper of Oliver and Pharr. The succeeding sections prescribe the methods which must be used to verify the testing instrument, as well as the parameters to be followed in the production and testing of reference blocks. The iNano nanoindenter system comes with a test method which follows ISO 14577-1, and which can be put into operation by simply opening it, specifying the testing sites and beginning the test. This test method is called ISO 14577 Test Method. The user may specify peak test force and loading periods at will, but it is not required for its operation. Once begun, the following parameters are automatically tested and reported: Young’s modulus, instrumented hardness, Vickers hardness, and normalized work of indentation.
How does the iNano compare to other instrumented indentation systems? When standardized testing is considered, the strong points of the iNano include its cost-effectiveness regarding low initial cost and cost of operation, fully automated operations and user- friendly features, its accuracy and the reproducibility of measurements obtained.
Materials and methods
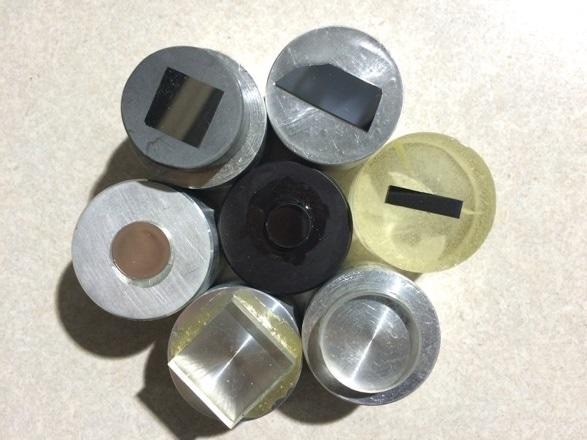
Using ISO 14577-1 standards, the iNano was used to test ten separate materials, all of which were polished to a smooth surface and mounted to standard epoxy or aluminum metallographic mounts of 1.25-inch (32 mm) diameter before testing:
- Sapphire along the c-axis
- Nickel
- Silicon <111>
- Silicon <110 >
- 316L steel
- BK7
- Fused silica
- Borosilicate glass
- Polycarbonate

Figure 1. Samples mounted to standard aluminum or epoxy metallographic mounts. The diameter of the mount is 1.25” (32 mm).
During the test, the default test procedure was followed to perform ten indentations per sample. The standard steps were used as below:
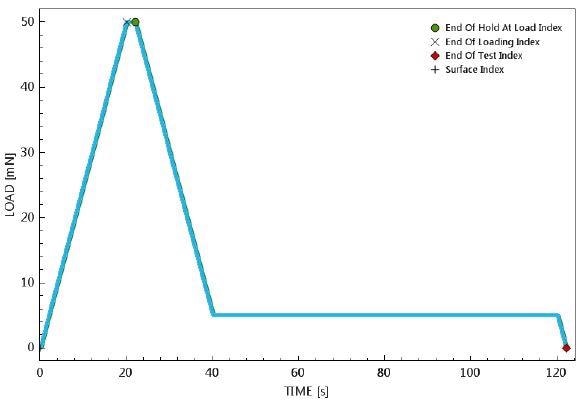
- At 100 nm/sec, the indenter and the surface were brought into contact over the full area of the indenter
- The indenter was pressed against the surface of the test material at a loading rate of 2.5 mN/second throughout, up to a maximum of 50 mN.
- At the peak, the force remained unchanged for 2 seconds, called the dwell period.
- Subsequently the contact force was brought down to 10% of the maximum at an unloading rate of 2.5 mN/second.
- At this point an 80-second period of constant force was applied on the indenter to detect and measure any displacement, which would be later used to calculate the thermal drift rate.
- After removing the indenter completely, the sample was repositioned for the succeeding test.
Each test was analyzed separately in accordance with ISO 14577-1 standards, with all ten results being averaged.
It is necessary to note that microhardness testing and instrumented indentation differ in that the area of contact is not measured as such but calculated from the indentation depth. The area function was A=24.355h_c^2+165.6h_c, the first coefficient being found with the use of a laser goniometer to measure the diamond angles directly. The second coefficient reflects apical rounding which is found by indenting a reference material and making the required calculation.

Figure 2. Load time history for the ISO 14577 standardized nanoindentation method. Loading, hold, unloading, followed by a second hold for thermal drift rate measurement.
Results and discussion
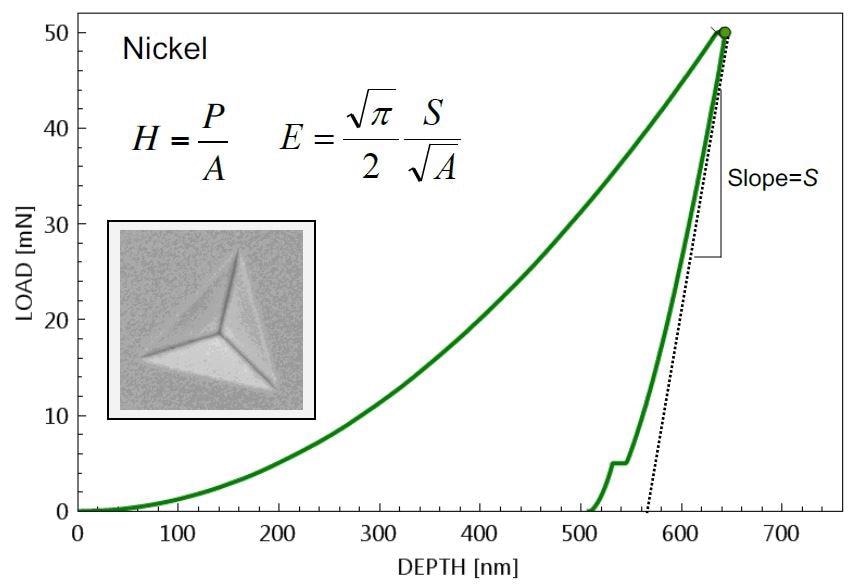
The ten tests produced the same type of load-depth curve following indentation into the test sample. These curves are then used to calculate material properties such as Young’s modulus (EIT), instrumented hardness (HIT), and Vickers Hardness (VHN), using the norms specified in ISO 14577-1.

Figure 3. Typical load-depth curve with Berkovich tip at peak load of 50 mN of nickel sample (Insert is the residual mark)
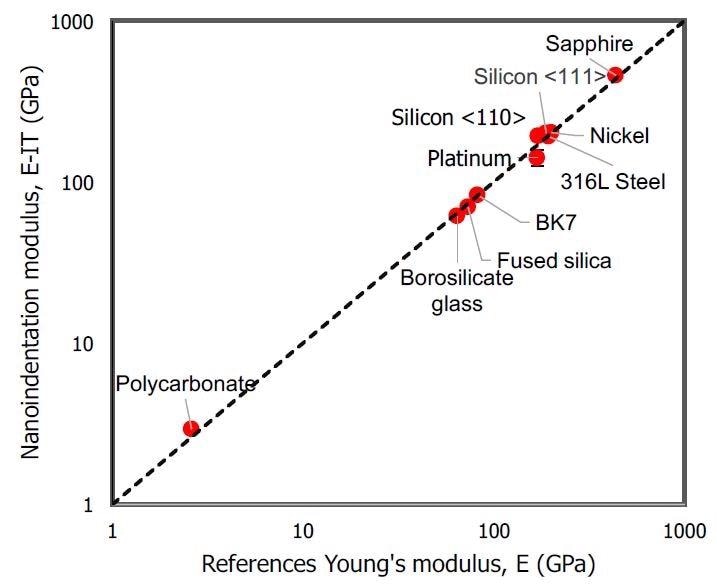
Table 1. sums up the test results in the form of the mean values. The standard deviation for all values is less than 10% of mean. The values obtained from instrumented indentation according to ISO 14577-1 standards were compared with reference values derived from other means such as tensile testing and ultrasound and were found to be within 10% of them for all tested samples. The hardness values were also considered appropriate, such as Vickers hardness of 17 kgf/mm2 (test value) vs 14 kgf/mm2 (reference value) for polycarbonate, and 577 kgf/mm2 vs 638 kgf/mm2 respectively for nickel. It is more difficult to validate hardness values which depend to a great extent on the microstructure, which in turn varies with the way in which the sample is processed and prepared. The experiment shows that Young’s modulus in all cases was in good agreement with the reference values when measured with the iNano nanoindentation system.
Table. Mean instrumented indentation results for 10 tests on each material to 50 mN
| Sample |
Poisson’s ratio |
Max Depth (nm) |
Reference Modulus (GPa) |
ISO Elastic Modulus (GPa) |
ISO Hardness (GPa) |
Vickers Hardness (kgf/mm2) |
| Polycarbonate |
0.37 |
3961.3 |
33 |
3.0 |
0.19 |
17.94 |
| Borosilicate |
0.20 |
736.5 |
644 |
63.2 |
7.71 |
689.57 |
| Fused silica |
0.17 |
680.2 |
735 |
71.8 |
9.66 |
912.98 |
| BK7 |
0.21 |
674.8 |
826 |
85.2 |
8.14 |
769.54 |
| Platinum |
0.39 |
1504.9 |
1687 |
141.1 |
0.91 |
85.57 |
| Silicon<110> |
0.28 |
491.3 |
1698 |
192.3 |
11.62 |
1098.50 |
| 316L Steel |
0.30 |
744.8 |
1939 |
196.0 |
4.55 |
429.76 |
| Silicon <111> |
0.17 |
511.2 |
18610 |
205.8 |
12.06 |
1140.37 |
| Nickel |
0.31 |
638.5 |
20011 |
213.9 |
6.36 |
600.75 |
| Sapphire |
0.30 |
344.3 |
43512 |
466.2 |
28.00 |
2646.78 |
Note: Vickers hardness values in this table were calculated from indentation hardness.

Figure 4. Average Young’s modulus measured in this work according to ISO 14577-1, as compared with reference values for the same materials.
Conclusions
Instrumented indentation tests were done using iNano Indentation systems in compliance with ISO 14577 norms, on an array of materials. This allows mechanical properties to be measured both rapidly and inexpensively, while allowing for high reproducibility and precision. The obtained values agreed well with the known reference values.
References
- “Metallic Materials – Instrumented indentation test for hardness and materials parameters.” ISO 14577, 2002.
- Oliver, W.C. and Pharr, G.M., “An Improved Technique for Determining Hardness and Elastic Modulus Using Load and Displacement Sensing Indentation Experiments, Journal of Materials Research 7(6):1564- 1583 (1992).
- http://www.engineeringtoolbox.com/young-modulus-d_417.html
- http://www.azom.com/article.aspx?ArticleID=4765
- http://accuratus.com/fused.html
- http://www.crystran.co.uk/optical-materials/optical-glass-n-bk7-and-others
- https://en.wikipedia.org/wiki/Platinum
- http://silicon.mhopeng.ml1.net/Silicon/
- http://asm.matweb.com/search/SpecificMaterial.asp?bassnum=MQ316Q
- https://www.el-cat.com/silicon-properties.htm
- https://en.wikipedia.org/wiki/Nickel
- https://gavish.com/

This information has been sourced, reviewed and adapted from materials provided by Nanomechanics, Inc., a KLA-Tencor company.
For more information on this source, please visit KLA.