Pores or vias with single-digit nanometer size are necessary for the realization of many applications. These include:
- Chemical sensors, such as localized surface plasmon resonance (LSPR) detectors, which require the sensing features to have a size approaching that of the measured moieties
- DNA sequencing via electrophoresis, which requires insulating membranes with a diameter close to that of the DNA molecule
- Biomolecule filtration and analysis, which requires nano-pore arrays with small size yet sufficiently high total throughput
- X-ray holography, for which a small apertures, slits, or other diffraction apertures are needed to produce a reference wavefront
The applications often require the pores to have a high aspect ratio of 10 : 1 or more. Thus it is desirable to have a method to make prototype or research devices with high machining precision and patterning flexibility.
Fabricating and Imaging Nanoscale Features Using Focusd Ion Beam
Charged particle beams are the most flexible tools both for fabricating and imaging features on the nano-scale. There are physical limits to the ability of charged particle beams to create the features required for the applications above. The most common method used today is the focused ion beam (FIB), based on the gallium liquid metal ion source (Ga LMIS).
Limitations of Focusd Ion Beam
This method is limited in it ability to work at the size scale of interest, however. One reason for this is the larger spot size, typically 3-7 nm, that characterizes a FIB beam. In addition to the central spot of the beam, the large energy spread of the LMIS (5 eV) leads to aberrations that put significant ion current into an extended beam tail. This tail causes machined features to become much larger than this as they are made deeper. This is an inherent limitation.
Figure 1 illustrates the effect of these LMIS beam tails on machining precision, showing a set of FIB-milled spots in a 100 nm thick gold foil. Milling was carried out by unblanking the beam in several spots, for different amounts of time. Even for the smallest time applied (20 msec), the feature created is more than 20 nm across, and the non-zero gray level inside the hole in this SEM image indicates that it did not go through the entire foil thickness. Even for an 80 msec spot mill, the via does not penetrate the target completely. At 1 sec machining time, a round 50 nm via appears to have been created.
Another issue with Ga-FIB is the damage caused by the beam to membranes. Recent work by Gierak on graphene milling revealed that the freestanding graphene membrane curled dramatically near where the FIB beam had been applied. A high voltage (200 keV) focused electron beam, such as in a STEM, can also be used to create vias in certain materials via knock-on effects, but the process is slow and limited in material choices.
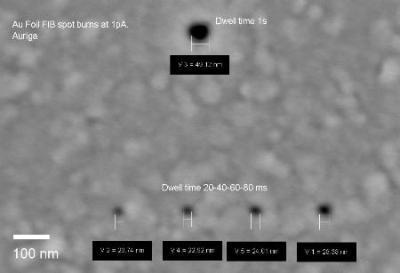
Figure 1. FIB milled spots in a gold foil. Results are imaged by SEM.
Helium Ion Microscope and Sub-Nanometer Size Probe
The helium ion microscope (HIM) produces a sub- nanometer size probe with a low mass ion. The beam has a tight spatial profile due to its low energy spread (1 eV) and a small convergence angle, both of which reduce aberrations. The sputtering rate is lower than for a gallium beam, but conversely this means that the sample interactions don’t spread the beam as quickly. Therefore sputtering events are much more likely to occur close to the beam axis. We give in this note a concrete example of this process, based on the application of creating nmscale vias in a 100 nm thick gold layer, with the end goal of creating a LSPR detector, as introduced above.
Creating Nano-Pores Using Helium Ion Microscopes
Vias can be created with HIM by direct sputtering of gold. Beam conditions which can successfully create these vias are given in Table 1. Vias down to 8 nm in diameter can be created in this fashion. If the beam is parked on one spot instead of scanned, a 5 nm via is possible. Figure 2 gives an indication of the machining precision. The via shape fidelity is characterized in this case by the amount of rounding of the corners and the sidewall angles. The corner rounding, measured by the radius of curvature at the four corners, is approximately 5 nm. The measured sidewall angles range from 88 – 90º. These excellent values allow for precise machining of features too small to be obtained by traditional FIB. The time required for the ion milling needs some explanation. For milling in a polycrystalline Au film, the milling rate can depend on the grain orientation of the spot where the via is being placed. This is seen in Figure 2a, where the machining at the right edge of the programmed raster area was impeded by a large grain. Thus only a general rule of thumb can be given. Re-deposition of gold back onto the sidewalls increases the required dose for high aspect ratio features. The rule of thumb for machining time through a 100 nm thick gold layer under the conditions of Table 1 is that a via of x nm width will require x seconds to mill. Thus, a 5 nm via is created in 5 seconds. For a more uniform material, the results will be amenable to tighter process control.
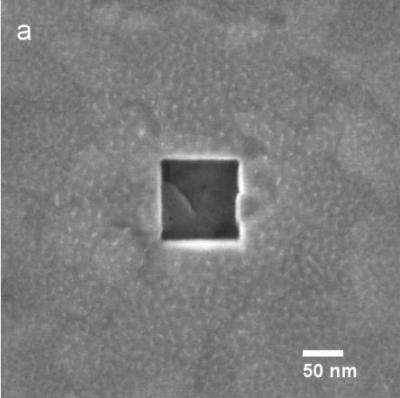
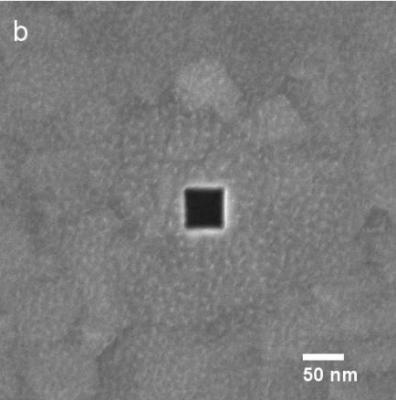
Figure 2. Square vias being created in 100 nm thick Au. Size in a) is 100 nm, size in b) is 50 nm.
Table 1. Settings for milling nano-vias in Au with HIM
| Parameter |
Setting |
| Beam Energy |
35 keV |
| Beam Current |
1 pA |
| Working Distance |
5.0 mm |
| Scan type |
Raster |
| Pixel density |
256 × 256 |
| Dwell time |
1 µsec |
| Time to mill |
1 sec / nm width* |
*Milling time is approximate, see text.
A final note about the endpoint of the milling process is needed. It is quite difficult to determine the endpoint for a via with a high aspect ratio, for the secondary electron signal from the bottom of such a feature is too weak. Two methods are described here for carrying out this task. The first is the examination of cross sections of the vias. Since cutting through a sub-10 nm via is impractical, one method is to create the vertical face of the cross section first, and place the via cuts near that face. This is applicable to thin film samples and is illustrated in Figure 3. A single-pass mill is executed to create an observation pit with a sloped bottom and vertical face (the top face in the Fig. 3a). Subsequently vias are formed near the edge of the vertical face for inspection (Fig. 3b). This can give a quick view of the milling process. It is not sufficient on its own for quantitative measurements, since the side escape path for sputtered atoms may alter the sputtering dynamics. Another method is applicable for characterizing vias in membranes. The solution is simply to inspect the front side, then flip the sample over and inspect the backside. This inspection is possible because the sputter yield is low enough that a high magnification image can be taken using the same beam that created the via. This does require that some registration features should be available to navigate to the same area on both sides of the membrane. Figure 4 shows the backside view of a 100 nm thick membrane which had been subjected to milling. (Note that the lift-off method used to create this membrane created a complex back side morphology, but the vias exited at flat areas.) Some smaller vias (arrows) did exit in raised areas. With high magnification imaging in HIM, the top and bottom via openings can be compared for determining sputtering yield or via profiles.
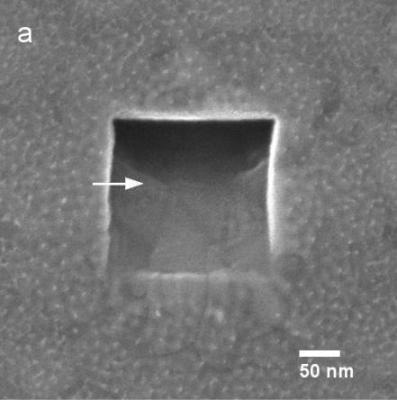
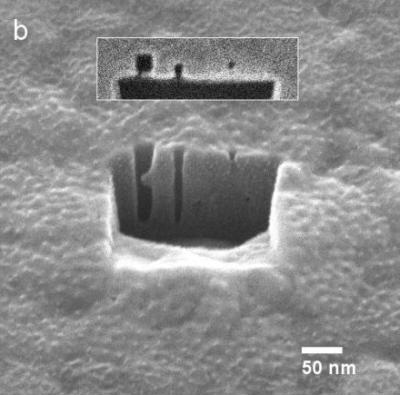
Figure 3. Cross section method for determining milling endpoint. a) creation of cross section face, b) machining of vias (top-down, inset) and observation on tilted sample.
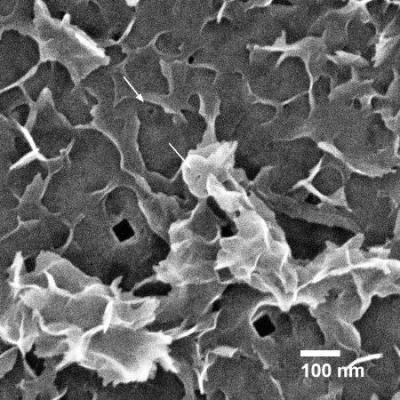
Figure 4. Exit side view of vias in Au membrane.
Of course inspection in STEM or TEM is possible as well, and is useful for checking the smallest vias in membrane samples. As an example, bright field transmission helium ion micrographs (an experimental technique) are shown in Figure 5. Vias down to 20 nm in Au still retain a basically square shape. below that they are rounded, consistent with the 5 nm radius of curvature machining precision. Membrane samples can also be used in the process of developing recipes for milling thin films, allowing inspection of both the entrance and exit of the via and providing guidance for milling time requirements, since it is easier to evaluate with S/TEM.
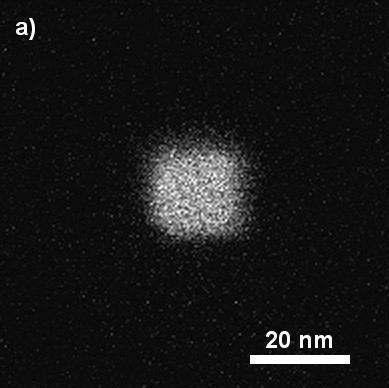
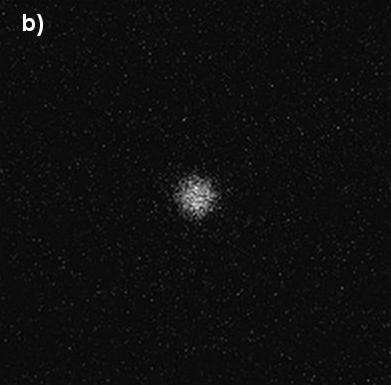
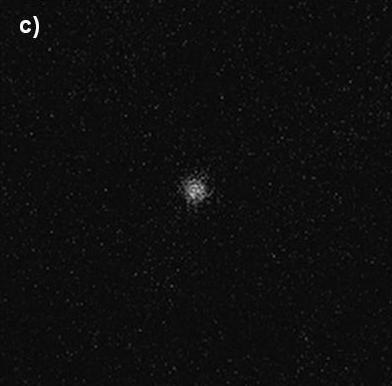
Figure 5. Real-time verification of endpoint by transmission imaging. Actual (programmed) via widths, in nm: a) 20 ± 3 (20) nm, b) 8 ± 1 (5) nm, c) 5.2 ± 0.5 (spot mode).
Application
Device fabrication requiring the creation of pores or vias with critical dimensions less than 10 nanometers.
ORION® PLUS Capabilities
Nanometer precision ion milling, high spatial resolution imaging which also emphasizes surface detail, use of a non-contaminating ion species; lithographic pattern tool interfacing.

This information has been sourced, reviewed and adapted from materials provided by Carl Zeiss.
For more information on this source, please visit Carl Zeiss.